I really enjoy knitting, and hats are one of my favourite items to make. I finished a hat for myself a little while ago that I wanted to line with fleece. I really like finishing hats with a lining – it makes them basically wind proof significantly warmer, a huge plus for our Yukon winters! As well, this can solve any itchiness for people who find wool irritating. I get asked how to do this every so often so I thought I’d take some photos of the process and post as a tutorial.
1: Select materials and make a pattern
You’ll need a finished knit hat, some polar fleece, and matching thread. I recommend making the knit hat a bit large for the recipient, since adding fleece will take up additional space inside the hat. My hat was a variation on my Simone’s Hat pattern that used slightly thinner yarn (Lion Brand Woolspun in the gorgeous Peacock colourway, a wool/acrylic blend). I find tightly spun acrylic/wool blends hold up well to being punctured by sewing thread – something loose, like a wool roving, may pull apart where the fleece is stitched in.
I fold my knit hat into quarters and trace it onto paper, leaving about an extra 1/2″ for the seam allowance.
2: Cut fleece
Use this pattern to cut out four pieces of polar fleece. I make sure that I line up my pattern pieces so that the fleece stretches horizontally.
3: Assemble a fleece hat
Next, I pin two of my pattern pieces together and seam one side (repeat x 2). I use a 1/2″ seam allowance and a regular straight stitch. Clip the curves – here is a good tutorial if you’re unfamiliar with this process.
Then attach these two halves to finish making a fleece hat and clip those curved seams as well. I push the seams open with my fingers.
4: Attaching the two hats
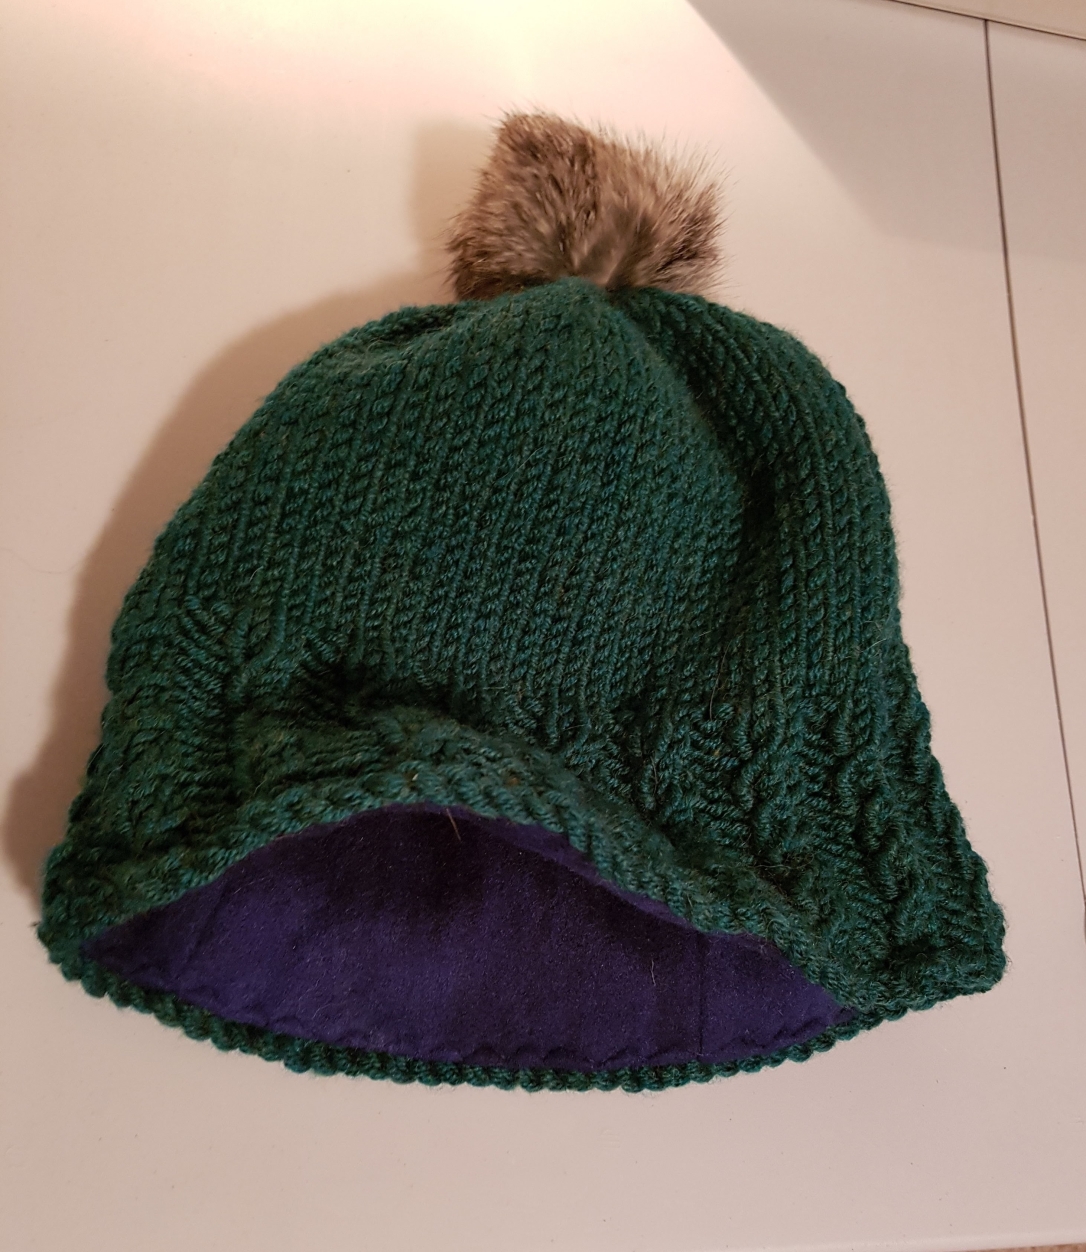
Insert the fleece hat into the knit hat with wrong sides together. I find I have to push and shape the two hats into one another at this stage to get the right fit.
Then turn the bottom edge of the fleece up into the knit hat, tucking the raw edge under, and pin right at the cast on edge of the knit hat. I find it helps to pin the seams of the four quarters first, then work my way around. You shouldn’t be able to see the fleece peeking out when looking at the right side of the knit hat.
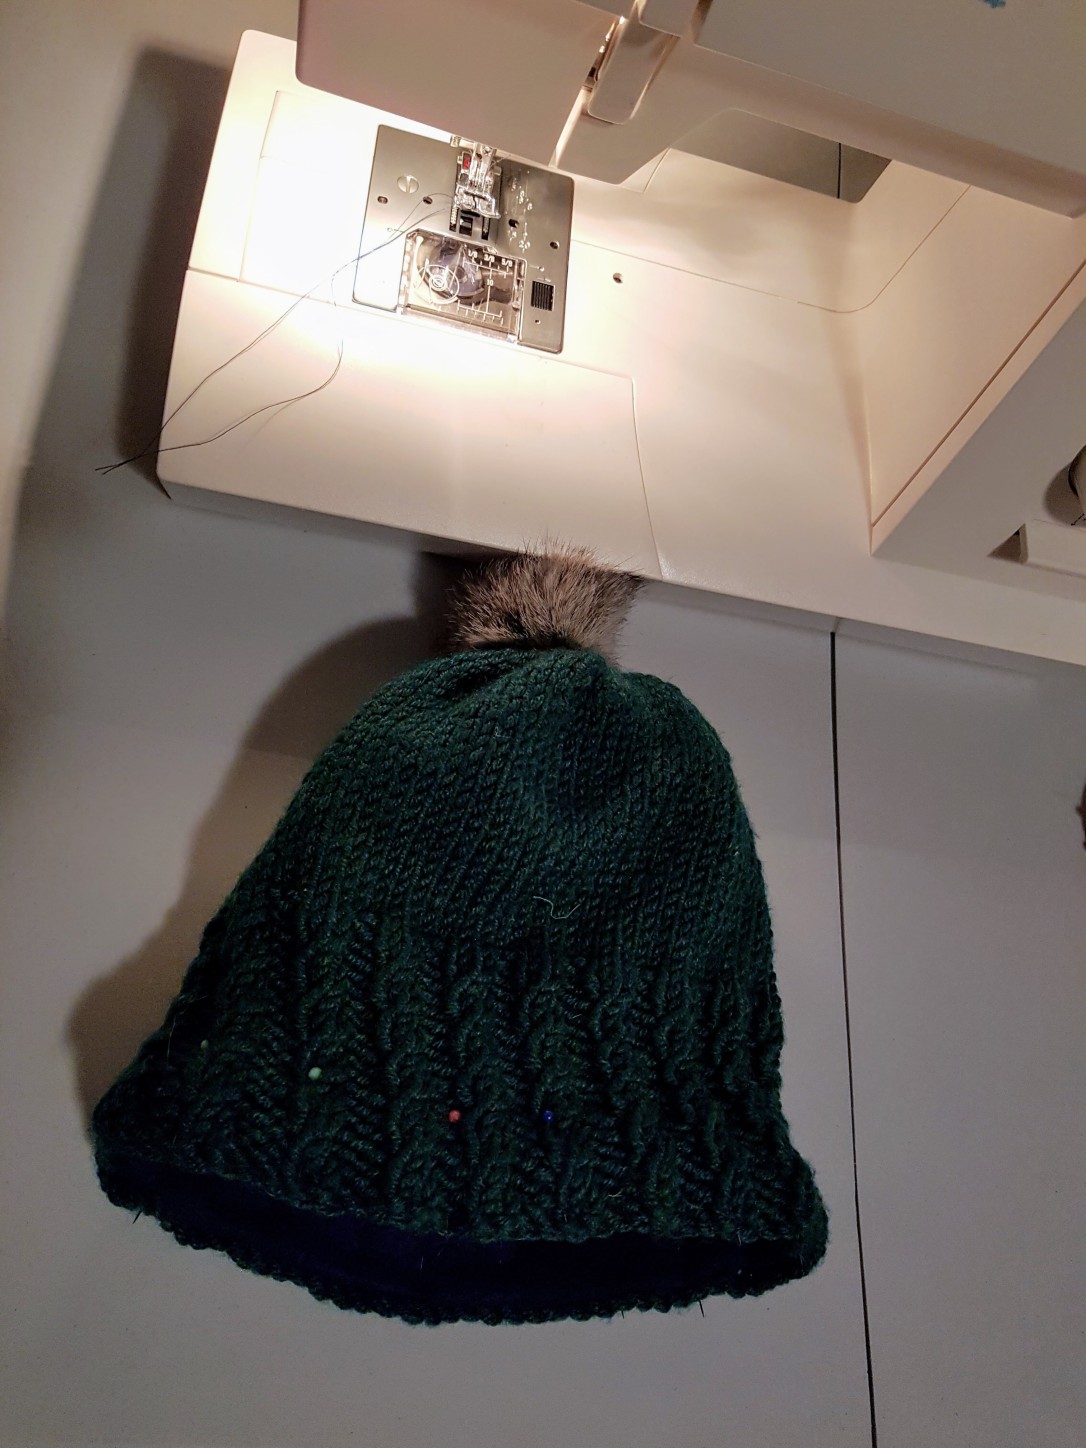
Finally – this is very important – switch the stitch setting to tricot stitch. This stitch, which is 5 little stitches in a triangle shape, has some stretch to it which preserves the stretch of the fleece and knit fabric, ensuring the hat will still fit. Then stitch around the bottom of the hat. I keep the cast on edge right at the outside of my presser foot.
5: Admire your finished product
That’s it! The photo below shows the tricot stitch inside the brim. If you like, you can hand sew a few stitches at the crown of the hat to keep the fleece from pulling out of the top of the hat.
I find the tricot stitch blends in quite well, particularly into the baby cable ribbing used in this example, so the finished look of the knitting isn’t affected. I attached the leather tag by hand as a final step.
In total, lining the hat took me about half an hour from start to finish (not counting knitting time, of course.) I hope you found this tutorial helpful! Leave a comment if you’re looking for more detail or have any questions.
It’s been a while since I posted on here – what better way to get back at it than with a new knitting pattern?
My dear friend Simone requested a bun hat earlier this spring – and then got a pixie cut. Because she’s a champ she wore it camping all summer anyway, but I felt bad that she had a hole in the top of her toque that she didn’t need! I insisted on making her a proper hat. She asked for orange, which ended up being the perfect match for this grey rabbit fur pom pom. I liked the result so much – it’s the perfect 3 hour hat – and I wanted to share it so that you can make one too.
Materials:
Cascade Yarns Lana Grande in colourway 6029 (100% wool) – 1 ball. This pattern will not use the whole ball. I had 26 g left over.
Size 11 circular needle (smaller than 22″) and double-pointed needles, or long circular needle for Magic Loop
Fur pom pom
Stitch marker
Tapestry needle
Size:
To fit an adult head (22-23″ circumference).
Pattern:
Cast on 56 stitches and place marker. Join in the round. Be careful not to twist.
Rows 1, 2, 4, 5, 7, 8, 10, 11, 13, 14: – *K2, P2* repeat around.
Rows 3, 6, 9, 12: *Baby cable, P2* repeat around. To make a baby cable, knit two stitches together, leaving the stitches on the left needle. Knit through the first stitch again and slide both stitches off the needle. This should make a twist.
After 14 rows of baby cable ribbing, switch to stockinette stitch until your work measures 7″ from cast on edge. If you’re knitting for a larger head, you could make this section longer.
Decrease section: Switch to double pointed needles or Magic Loop once there are too few stitches to move comfortably around your circular needle.
*K6, K2tog* repeat around
*K5, K2tog* repeat around
*K4, K2tog* repeat around
*K3, K2tog* repeat around
*K2, K2tog* repeat around
*K1, K2tog* repeat around
*K2tog* repeat around
Cut the working yarn and thread it through the remaining stitches. Pull tight. Weave in ends and block. Once dry, attach fur pom pom.
I’ve been meaning to write about our Chilkoot trip a bit more. We wanted to go not just as a backpacking trip but also because of the historical significance of the trail. It felt like a rite of passage – a way of earning our place in the Yukon by taking a trail used by both the Chilkat and Tlingit for trade over thousands of years and by naïve Stampeders coming to the land of golden dreams with their ton of goods.
Crater Lake – note the remains of the tram system on the left
We had a fantastic trip and I wanted to pass on some tips for gear and planning for others who may be interested in doing so. Here are some timing and gear considerations:
1) Timing
There are two timing components to consider for your hike – when you will go, and how much time you’ll take.
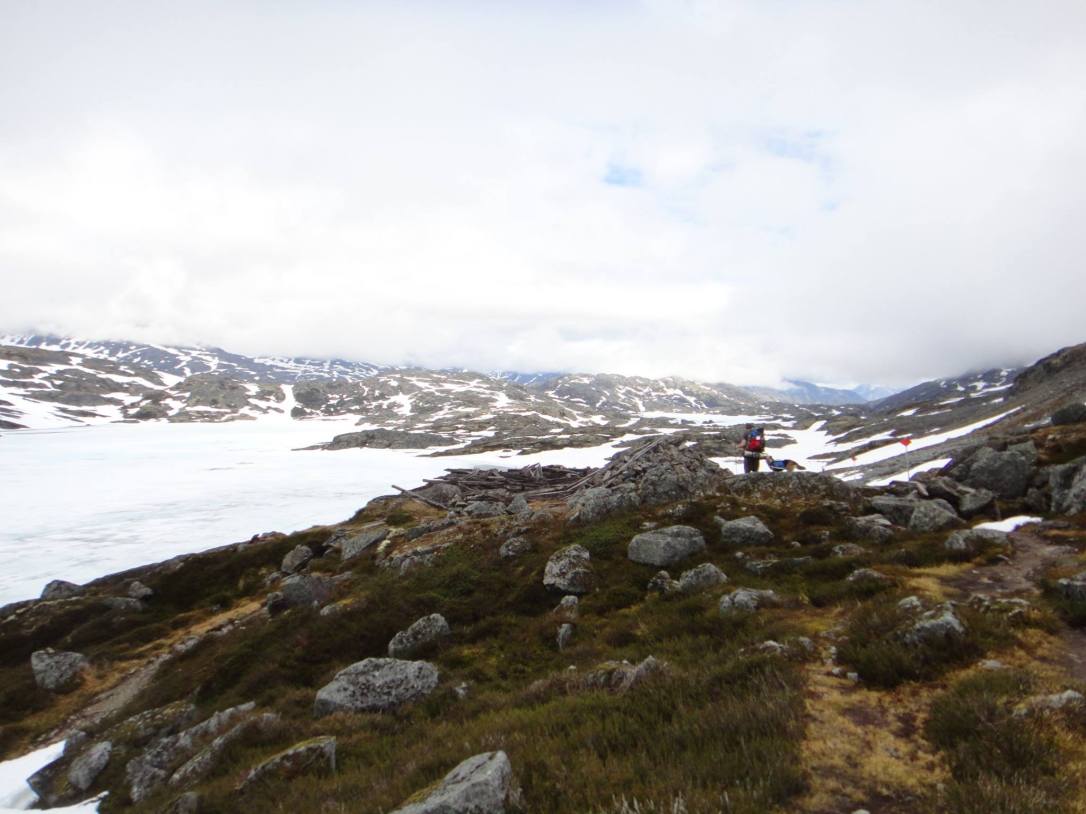
We hiked the 53 km Chilkoot Trail from Dyea, Alaska to Bennett, British Columbia over 3 nights/3.5 days in late June. We got lucky and the weather was fantastic, but at the time of year it could have just as easily rained or snowed. There was still quite a lot of snow cover near the summit and just past Happy Camp and there was a low risk of avalanche. We found the snow cover made things easier for us as it smoothed out the rocky terrain, and we finished our summit day in great time. However, if it had been raining and icier the snow cover would have been a problem. If you don’t think you will cope well with snow or avalanche risk, then go later in the summer. July is the most popular time. However, keep in mind that evenings in August tend to be colder and there is less daylight.
At the Summit – note the nearly complete snow cover
Permits are required for the trail and making reservations well in advance is recommended, as the number of hikers per day is limited. When you call to reserve your permit, you need to advise which campgrounds you’ll stay at as camping is only permitted in designated areas. This leads to the second point – how much time will you take?
Elevation profile of the Chilkoot Trail (source: Parks Canada)
We stayed in Sheep Camp, Happy Camp, and Bare Loon. In the early season, the rangers require you to leave Sheep Camp early in the morning – we left at 6:35, but slower groups are advised to leave as early as 5 am – so that you’re across the summit by noon because of avalanche risk. This means almost every hiker stays in Sheep Camp, which is 21 km from the trailhead. Sheep Camp is fairly large and spread out, with the tent pads up a hill from the cooking areas and bear lockers. The summit day is considered to be the most demanding day (although I also found it to be the most enjoyable) even though it is only 12 km to the next camp, Happy Camp. This was my favourite camp site – there is a creek running through the middle, which means easy access to water, and the camp is fairly compact so you don’t need to travel far between your bear locker, cooking areas and tent pad. As bonus it’s beautiful, and we had gorgeous weather. We hiked 14 km to Bare Loon the third day, whic was our least favourite camp site – the bugs were horrendous and the cooking area is not fully enclosed, so there is no escape. We were then left with a very short day out (only 6 km) and a long wait for the train on the last day.
Tent pads at Happy Camp
If I were going to do it again, I think I would either go longer or shorter. If I were to do a longer itinerary, either for a more leisurely trip or with less experienced hikers, I would stay at Canyon City, Sheep Camp, Happy Camp, and Lindeman City (note: Lindeman City is the only campground without wooden tent pads.) There were quite a few families with kids on the trail with us, and they tended to do a 4 night/5 day itinerary. This is in part because the section of trail between Canyon City and Pleasant Camp, in my opinion and according to some quotes on the interpretive signs at Pleasant Camp, many stampeders as well, is the worst on the trail. It is very muddy, with lots of ascents and descents over rocky, root-covered trail. There is also a neat detour at Canyon City that leads to the boiler that powered the tram line to Crater Lake, but this adds 1.1 km to an already long day. Breaking up the first day would make it much more manageable, particularly if you want to stop and snoop around at Canyon City.
Suspension bridge to Canyon City
Alternatively, if I were going solo or with very experienced hikers, I would do it shorter and stay at Sheep Camp and Deep Lake. If I were to do another 4 day trip, the only change I would make would be to stay at Lindeman City instead of Bare Loon, since it is larger, has several cabins that are enclosed and an interpretive centre explaining much of the history of the gold rush.
The final timing piece to consider is transportation out of Bennett. Your options are either to catch the White Pass and Yukon Route train, which is what we did, or to organize a plane charter. The train doesn’t run every day, which you need to take into account in your planning. Once back in Skagway, we took the Dyea-Chilkoot Trail Transport to retrieve the truck from the trailhead.
Train station in Bennett, the end of the trail
2) Gear
It’s important to think about gear in systems, rather than individual items. This ensures that all of your gear works together to cover your essential needs. You want to keep your pack weight as low as possible, which doesn’t leave room for things you may not really need or one-off items. You need a shelter system, a cooking system, and a water purification system, and all of these need to fit in the all important backpack. I include clothes in my shelter system, but will list food separately from my cooking system. If travelling in a group of 2+, you can share a tent and cooking gear. Luc carried the tent, and I carried the cooking gear, water purification system, and extra food.
Most of these items are not ultralight/ultraexpensive backpacking options, but gear we’ve accumulated over the years and has served us well. (Note: None of the below are affiliate links, nor necessarily where I purchased the item.)
Recreating the “Ton of Goods” sculpture post-hike. This is the only good photo of my backpack.
Backpack:
Me: North Face Banchee 65 – This pack is very light and well-reviewed on Outdoor Gear Lab. The beaver tail design is great for holding water bottles and other random stuff that you want easy access to, like a rain jacket or camp shoes. I bought a men’s small/medium since it fit me best, but it also comes in ladies’ sizes.
Luc: Bandlands Clutch – this is a heavy, but very durable pack. Badlands has amazing warranty as well. It weighs twice as much as the Banchee empty, but only has a 47L capacity to the Banchee’s 65.
Rainfly that fits over everything hanging off your pack.
Shelter system:
Tent – we looked at backpacking tents, and couldn’t justify spending $300-500 to cut a mere 2 lbs or so. We took our 12 year old, 4-person dome tent from Walmart that weighs 8 lbs. Your mileage may vary. If I were going solo, I would invest in a smaller, lighter tent.
Sleeping bag – We each took one of these Woods sleeping bags from Canadian Tire. They were super, super warm and extra long which is important for us tall people. However, they don’t pack down very small. I put mine in a 30L dry sack and strapped it to the bottom of my backpack.
Inflatable Thermarest Trail Scout – these come in different lengths. I packed mine in a 10L dry sack.
Thermarest packable camp pillow – I’m a side sleeper and found that having a pillow did wonders for my comfort. Luc opted out of this one and just used his fleece.
For clothes, we were as Spartan as possible and I didn’t regret it at all. This is one area where you really need less than you think you do. The list below is per person.
Pants: we brought what we call kayaking pants – they’re a quick dry nylon blend and a bit stretchy, and can be buttoned up into shorts if desired. I like these ones.
Shirt: One merino wool t-shirt – keeps you warm, wicks sweat, doesn’t get too smelly. Synthetic jogging type material would be okay but much stinkier by the last day. Whatever you do – NO COTTON.
Socks: Merino wool. Bring one pair per day plus one extra.
Underwear: I took one pair per day.
Baseball cap
Sunglasses
Sturdy, comfortable hiking boots
Long underwear – either wool or synthetic. I like this kind. I only wore mine to sleep in.
Insulating layer – I took my light down puffer jacket, Luc took a fleece. Again, we didn’t need these much, but I wouldn’t have left them behind.
Rain jacket – waterproof and packable. Must have a hood and fit over your insulating layer.
Toque, light gloves, and a Buff – the weather was nice enough we didn’t really need these, but I wouldn’t have gone without them.
Camp shoes – we took these cheap water shoes because we thought the creek crossings might be high, but they weren’t – instead we just wore them around camp, but it was worth it to be able to ditch the boots and dry them out.
Gaiters – a huge help on the summit day for keeping snow out of boots.
Cooking system:
MSR pocket rocket stove – super light and compact. No moving parts except the valve. Many people we were on the trail with used the JetBoil system.
Fuel canister
Pot and dishes – we have this MSR set which is ideal for two people. I only brought the large pot along on this trip. Sporks fit inside if you’re only bringing the big pot.
Collapsible BBQ lighter (plus backup matches).
Biodegradable camp soap.
Water purification system:
SteriPen + pre-filter – this is great for two people, max. With a larger group I would choose a different system.
Two wide-mouth, 1L Nalgene water bottles per person. The pre-filter fits on these perfectly. We found there was access to water enough places that carrying two litres each at a time was plenty.
I brought some back-up purification tablets in case the SteriPen batteries died, but I don’t like using these for my main system they leave a taste.
Packable dog bed – see tutorial here to make your own.
12 ft dog leash. Dogs must be on leash on the trail. I made this one myself because a shorter leash and trekking poles were not compatible at all.
Other essentials:
Tiny point-and-shoot camera
Gerber Multi-tool
First Aid kit
Toiletries – including bug spray and sunscreen. I sunburned pretty badly. Don’t be like me.
Hand sanitizer
Wet wipes
Toilet paper – TP is provided in the outhouses on the American side but not on the Canadian side.
Small trowel
Large Ziploc bag for packing out garbage.
Blister Medic – these are all pre-cut which is really handy.
Trekking poles – these saved me from falling many times. I wouldn’t do the hike without them.
All of our food for the trip
Food:
Pack all of this into a smaller bag inside your pack so that it’s easy to load into the bear locker (along with toiletries, pots and cooking fuel.)
Snacks: 3 small bags trail mix to share, 4 protein bars and 1 chocolate bar each, 1 small bag of dried fruit to share.
Breakfasts: 3x 2 packets of oatmeal each, 1 Starbucks instant latte for me. I wasn’t willing to forego my coffee.
Lunches: 3x two cinnamon raisin bagels with peanut butter each. Luc normally ate half of my second bagel.
Dinners: 3x Mountain House or Backpacker’s Pantry dehydrated meals each. I would strongly recommend the Backpacker’s Pantry Chana Masala – it was surprisingly good! We just ate these straight out of the bag.
We came home with 2 protein bars, 1 bag of trail mix and 1 leftover dehydrated meal. That said, if it had been cold we would have likely eaten everything we brought with us.
Once fully packed, my bag weight about 32 lbs and Luc’s weight 38 lbs. Overall, that was pretty close to what we trained with and we found it very manageable. I didn’t feel like I had missed out on bringing anything or like anything we had was something I could have left behind.
On the whole I thought the work we did to plan and pack served us well and I hope this (longer than anticipated) guide helps you plan your trip. If you have found this post helpful, find something that I have missed, or have pointers of your own from your Chilkoot experience, please post a comment below.
We hiked the Chilkoot Trail a few weeks ago with our dog, Duke. (I’ll give more details about our experience in a future post.) When we were getting ready for that trip, we had to make sure that we had the appropriate gear, both for us and the dog.
One of the items we had a hard time finding was a small, warm dog bed that would fit in Duke’s backpack. Ruffwear makes what they call a packable dog bed, and I was able to find it at a local store, but it took up more space packed up than my regular size Thermarest so it wasn’t going to work. Since I couldn’t find what I wanted, I decided to make one myself. Here’s a tutorial in case our fellow hikers are having similar problems.
1: Select a size and materials
I opted for polar fleece because it insulates even when wet and it can be machine washed and dried. I used Duke’s favourite dog bed as a gauge for size and made sure the finished product would fit in his backpack (about 20″ by 36″). I had this fun, printed polar fleece in my stash of fabrics and I thought this would be a great opportunity to use it.
2: Cut out three pieces of fleece and quilt two together
I decided that two layers of polar fleece wouldn’t provide enough padding, so I cut out a third piece the same size and quilted it to the top layer. I pre-marked my quilt lines with chalk.
3: Attach bottom layer and elastics
Once the top and middle were quilted together, I pinned two 12″ pieces of elastic in loops to the bottom edge – this is to hold the bed together when rolled up, like a sleeping bag. I checked the length of elastic needed by folding my fabric sandwich in half and then rolling it up. I then placed the wrong sides of my quilted layers and bottom layer together and stitched around the edge, leaving a healthy 5/8″ seam allowance and about a 6″ gap at one end so I could turn it inside out. I clipped the corners before turning it inside out so they would be nice and sharp.
4: Top stitching
The last step was to pin the gap closed and top stitch all around. I used the edge of my presser foot against the edge of the fabric as a gauge.
Here’s the final result. From design to completion it took me about an hour and a half to finish. The only thing I would change if making another would be to remember to account for my seam allowance when pinning in the elastics – they aren’t spaced perfectly evenly.
We packed the bed in a plastic grocery bag to keep it dry in Duke’s backpack on our hike. It worked really well in the tent – it kept him off of our inflatable air mattresses (well, sort of) and was small and light enough for him to carry in his own pack. It also washed well once we got home. Overall, I think it will serve us well on future camping trips, and I hope any fellow crafty, hiking, dog people – that’s quite the combo – will find this useful!
Last February, Luc and I bought an older travel trailer. He spent many summers camping in a tent trailer with his folks, and I’d never owned anything but a tent so we considered this to be a cheap experiment to see how we liked it. We loved it and this summer, we decided to upgrade to a slightly newer, nicer unit that suited our needs a bit better. Buying and selling the travel trailers taught us some useful lessons which I thought I’d pass along here.
So, you want to buy a camper? Here are a few points to consider.
1) What is your philosophy of use?
Full disclosure – Luc watches a lot of Nutnfancy videos on YouTube. Therefore, I overhear a lot of Nutnfancy talking about the merits of Spyderco vs. Cold Steel and the merits of various AR-15 accessories. I think Nutn likes the sound of his own voice a bit too much, but he’s smart, and he came up with a great concept with this term. Philosophy of use essentially means – how are you going to be using this item? Is it the best version of that item for your planned use? Nutnfancy mostly uses this term when talking about knives and rifles, but I think it has a place in the camper discussion as well.
Be it truck camper, motorhome, camper van, travel trailer or fifth wheel – there is no perfect system for all camping applications. What kind of camping do you like to do? Do you value compact size? Flexibility? Fuel economy? Lower maintenance costs? Space for a large family or to bring along friends? Will you be hanging out in one spot, using it as your base and adventuring from there? Or will you be covering a lot of miles and be packing up and moving on each day?
We tend to do mostly short camping trips, and ones where we travel to a different location each day. We also like to be able to explore more remote areas accessible only by sketchy roads. We already own a pick-up truck (they are the gateway drug of toys), so we don’t want to be maintaining another motor. Sometimes we like to throw our bikes or fishing gear in the box of the truck. We also like to take our pets camping with us most of the time. These pieces all factored into our philosophy of use.
Although a camper van would be ideal in some ways because of their better gas mileage and compact size that lets you park the anywhere and be totally self-contained for moving along each day, we’ve opted for a smaller travel trailer twice now. Travel trailers are easy to hitch up and disconnect, meaning that the trailer can easily be left at a campsite while we take the truck up some random back road. There are also more options on the smaller end of the spectrum; fifth wheels don’t tend to come smaller than 25 feet. The box of the truck is left open for extra gear unlike a fifth wheel or truck camper, allowing for more flexibility. We felt more comfortable purchasing a travel trailer used in a private sale because there are no engine components to worry about. The discussion of costs leads well into my next point of consideration.
2) What’s your budget?
Budget will impact whether you can buy new or used, and the age of the used unit. It also has some impact on whether you can purchase a camper that fits your exact philosophy of use or whether you need to compromise.
Part of why we haven’t seriously considered a camper van as of yet is because any camper vans within our budget are at least 20 years old, and I have concerns about reliability at that age. I’m not mechanically inclined and I want to spend my weekends camping, not fiddling with and fixing an older vehicle.
The initial purchase and maintenance costs that go along with a travel trailer are much lower than a camper van or motorhome, although the fuel consumption of the truck while towing is higher. The insurance costs are also much more expensive on a camper van or motorhome than a travel trailer, which is covered in part by the tow vehicle’s insurance.
Now that you have sorted out your philosophy of use and budget, time for the fun part – actually shopping.
3) What layout and features will suit your needs?
Once you’ve decided what type of unit you’re looking for, the next most important piece is layout. How many people need to sleep in it? Are you okay with putting the dinette up and down every day if that is the only bed? Do you need a lot of storage for gear? Is having a bathroom, or an oven, or an outdoor shower a deal breaker, or are these ‘nice to haves’?
When you view the camper, move around in it as if you were using it – stand at the sink, sit at the dinette, lay down in the bed. This was a big mistake we made when we bought our first travel trailer. Luc didn’t lay down in the bed, and he ended up being too tall for it – fine for shorter trips but not for longer than a weekend, and this was a big part of why we started looking to upgrade. Also, consider things like where you’ll be driving and the towing/payload capacity of your vehicle – will the outdoor features work for you? The grey and black water valves and outlet on our old trailer sat quite low to the ground, and ended up being a limiting factor for taking it down rougher roads. Is the unit light enough to be moved comfortably with your vehicle? Will you need an equalizer hitch or any modifications to your tow vehicle?
Finally, if you’re buying used, do two very important things:
Run through all of the appliances and systems to ensure they’re working properly. Appliances like refrigerators and water heaters cost a pretty penny to replace. Check for leaks from plumbing while running the sink and the water pump and heater while they are running.
Particularly if you’re buying a unit that isn’t fibreglass, carefully inspect inside every cupboard and storage compartment. You’re looking for leaks, musty smells, or evidence of shoddy repairs. Check all of the seams around vents and in corners for dried out seals that can leak. Repairing leaks can cost a fortune, but leaving them unchecked can impact the structural integrity of a wood-framed structure.
Happy shopping! Enjoy upgrading from your tent and taking advantage of late and early season camping in your new camper.
I’ve neglected the blog for the last few weeks. To be honest, shoulder seasons are not great in Yukon – it’s not cold enough for winter activities but too cold for summer ones, and the trails are a muddy mess – so we haven’t been up to as much outdoor adventuring. That said, we are planning ahead for summer camping trips and even fall hunting already. I’ve started taking tracking classes with the dog to improve our grouse season this year, which is fun, and we’re starting to think about de-winterizing the camper and getting out there soon. We have plans to hike the Chilkoot in June, so I hope the trails dry out so we can get out hiking! We’ve had lots of blue skies and clear days in April, which I hope keeps up over our short Yukon summer.
Luc’s skidoo was finally repaired this week (parts were backordered following its last little adventure) and we’ve had more snow in March than we’ve had all winter so we were itching to get out for a ride. The weather yesterday was beautiful and it was shaping up to be a perfect day.
Our first stop was to pick up my snowmobile from our friend’s yard where we’d been storing it while Luc’s was in the shop. We parked the trailer, brushed off the M6, Luc pulled the cord and…he fell backwards holding about a foot of it. Of all the things that can go wrong with a snowmachine, I was not expecting that. Luckily, we were able to fish out the other end of the frayed cord, tie the two pieces together and get the sled running and onto the trailer. The knotted cord wouldn’t fit through the usual spot for the handle so we fished it through a notch in the steering column and let the handle sit on the dash.
We went for a great ride at Mt. Sima up a small mountain to a summit overlooking Fish Lake. The snow was fantastic and the views were even better. There were quite a few other people out enjoying their sleds. We stopped at the top of the hill for a quick photo op and decided to turn around when Luc took the Expedition just a little too far to the right on the trail and punched through the snow all the way to the ground. Since we had very little snow earlier in the winter, all of the fresh snow we’ve gotten in the last few weeks is sitting on a fine, powdery layer of snow – if you go through the hard pack on top, you’re going all the way to the bottom. The Expedition weighs over 700lbs so anytime it gets stuck, digging it out is a production. We definitely noticed that we’ve not been hitting the gym since Rendezvous since it was even more difficult to get out than usual.
I was hesitant to shut off the M6 in case our MacGuyvered pull cord gave out a second time, leaving it stranded, so while Luc was digging I went to turn it around and get some fresh snow through it to cool it off. Well, I took the turn a bit too slowly and I got stuck too. At least the M6 only weighs around 500 lbs so getting it out is much easier, but I still struggled more than usual to move it. Deadlifts are good for something after all, and it’s time to get back to doing them.
On our way back down the hill we found another stuck rider and helped dig her out, so we were quite tired by the time we got our machines back on the trailer. We stopped by Winterlong Brewing on the way home to pick up a few beers and cracked the Mountain Hero Saison when we got home – given the day’s adventure it seemed like an appropriate choice.
It’s been a quiet March. I went straight from Rendezvous madness into a very busy period at work so our weekends and evenings have been fairly low-key lately. I did sign up for a free sock class at the Heart of Riverdale Community Centre – the last class is tomorrow. The knitting circle there is doing a sock drive to collect 150 pairs of hand-knit socks to donate to the Outreach Van as a Canada 150 project, so they decided to offer a sock class in order to teach more people how to knit socks and therefore be able to participate in the project. It’s for a great cause – I made a few hats and neck warmers for the last Outreach Van drive in the fall but no socks – I’m down to the heel turn of my second sock so far. Somehow it is a bit smaller than the first one though, perhaps because I decided to learn Magic Loop to get away from the dreaded double points. It’s been fun to learn some new skills and support a good cause while doing so. Here’s hoping I can get through a few more pairs before fall.
Well, we are now into March and Rendezvous is done. It was a wild ride. We danced in about 40 shows, counting all of the school and hospital and care facility shows. The school shows and care facilities are some of my favourites, because it means so much to the kids, and especially the residents who can’t get out much, to have Rendezvous spirit brought to them. The community engagement part of volunteering for Rendezvous is really valuable to me. After all the shows were done, we capped off the festival with the parade in fabulous weather. Luc drove us in our truck which was really fun – we ended up decorating it in the 15 minutes before the parade started but everyone banded together and the truck looked fantastic. I was not expecting “10 can can girls in the truck box” to be a reason why I wish we would have bought a 3500 instead of the 1500, but there you go – Yukon life can always brings the unexpected. Overall, it was a good run but my knees are grateful it’s over.
This latest pattern has been sitting nearly complete on my desktop for a while, but with all of the Rendezvous madness of the last week I haven’t had time to finish it up until now.
After Mike gave us a hand with rescuing our skidoo from the bush, I wanted to make him a hat as a small thank you gift. (I made Bev a bun hat too, just because she’s awesome. We have the best neighbours). I really like hat patterns that have stranded colourwork as an accent in a band around the crown, and I’ve made quite a few like that over the years. However, lately I’ve been enjoying chunky yarn and textured stitches so I decided to employ a similar concept to a colourwork band but using different stitches instead. I was quite pleased with the resulting hat so I decided to write down the pattern to share. You can download it from Ravelry as a free pattern. Happy knitting!